Overview
The PM Toolbox is a job management tool for work orders.
The main functions of the PM Toolbox:
•Allows foreman to view their current jobs and print them out if needed. Added parts will be printed on the work orders.
•Allows users to maintain and manage their jobs
•Allows planners to maintain and view jobs for their foreman
•Time management for resources and artisans
•The Find WO function allows the user to locate the jobs & find the current tabs on which the work can be located
Function
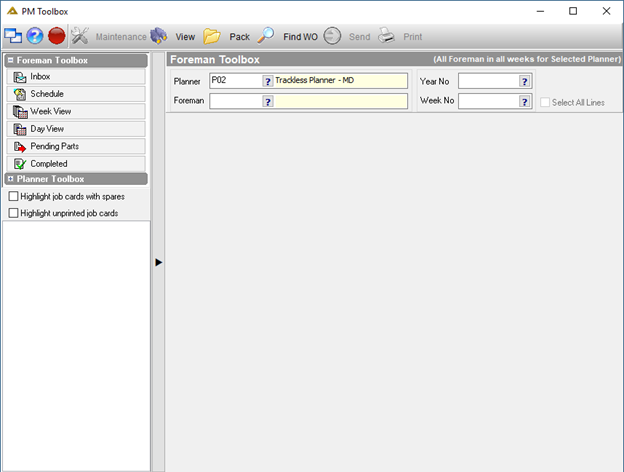
Once the application is opened, select a Foreman or Planner to continue:
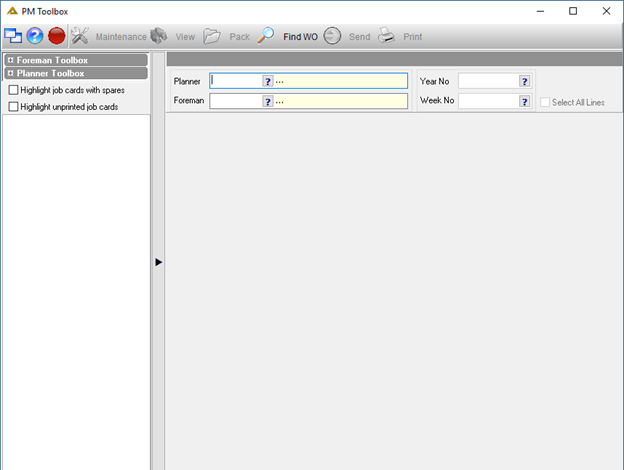
The system will then automatically select the current year and week.
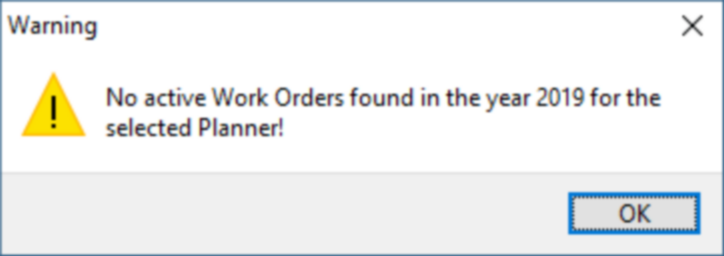
If no work orders have been created for the current week you will receive the following message:
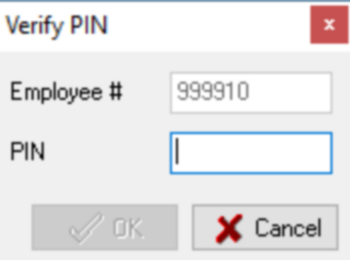
A Verify Pin Screen will then be displayed.
(This pin input screen only displays if you are the selected planner or foreman)
Enter your pin to gain full access rights for the selected Foreman or planner.
Use the Set Pin application to setup or manage your pin number. (System Management > User Administration > Set Pin)
Click the ![]() or the
or the ![]() option on the left-hand side of the screen. Clicking this option will display a list of available options as can be seen below.
option on the left-hand side of the screen. Clicking this option will display a list of available options as can be seen below.
You can now click one of the available menu options on the left-hand side of the screen to load the data for the selected option.
You can at any time see how the data is filtered by looking in the top right-hand corner of the screen
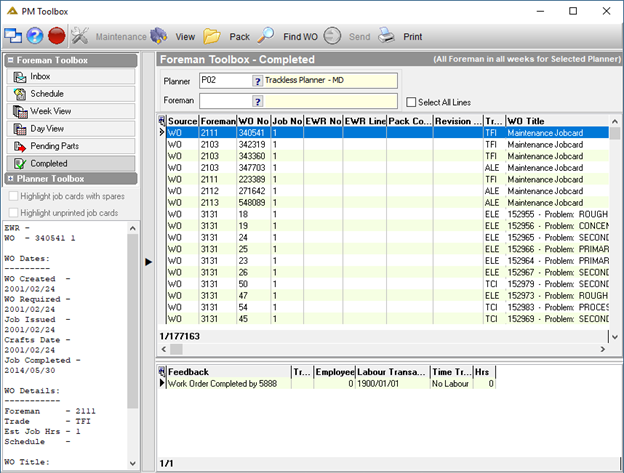
The left-hand side of the screen will display a summary of information for the selected work order.
You can select multiple work orders by holding down the CTRL key and clicking different lines in the grid. The summary on the left will indicate all the selected work orders.
Multiple job selection can be used to perform certain actions in bulk. Printing multiple job cards for example.
You can select all the lines in the grid by checking the ![]() box.
box.
The menu options and easy view on the left-hand side of the screen can be hidden so that more of the grid is visible.
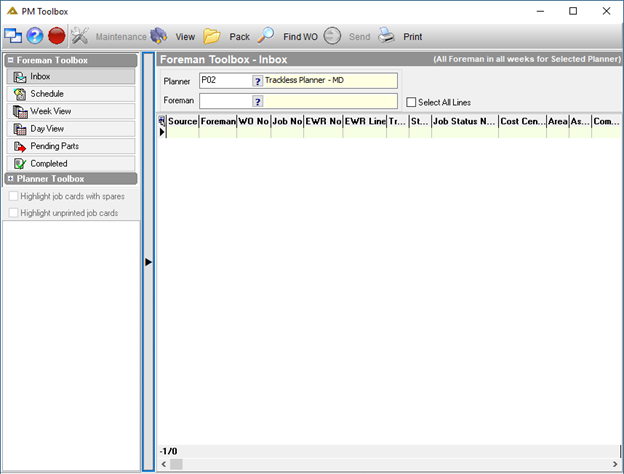
Foreman Toolbox
Inbox Option - This option displays all the work orders with a captured status.
Approved Electronic Work Requests (EWR) have a captured status and will show in the foreman inbox.
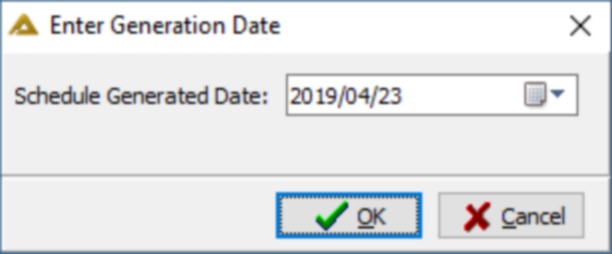
Schedule Option - This option will show all work orders created for schedules generated on a certain date.

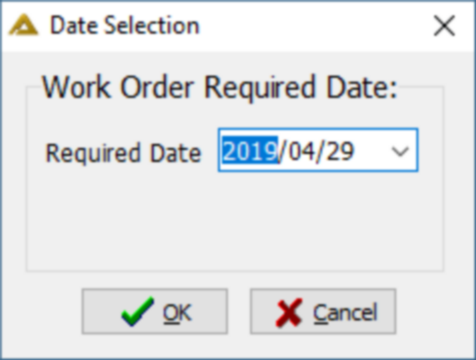
Select a date on which the schedule was generated and click on the ![]() button.
button.
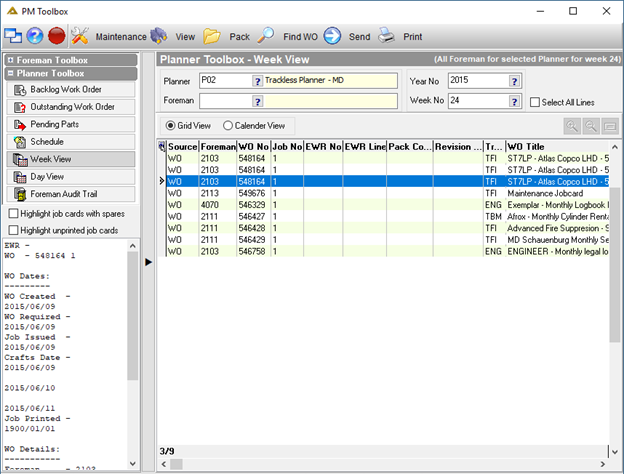
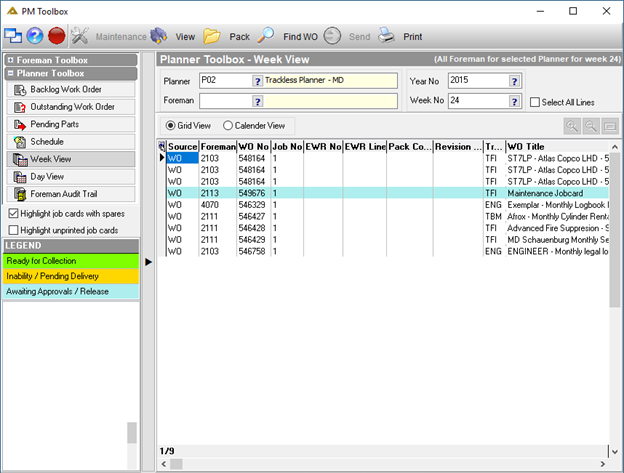
Week View Option - This option displays all the active work orders for the foreman (Status = 100) as well as work orders pending parts approval (status = 70). The Planner Toolbox will display all jobs for all foreman linked to the planner if no foreman is chosen.
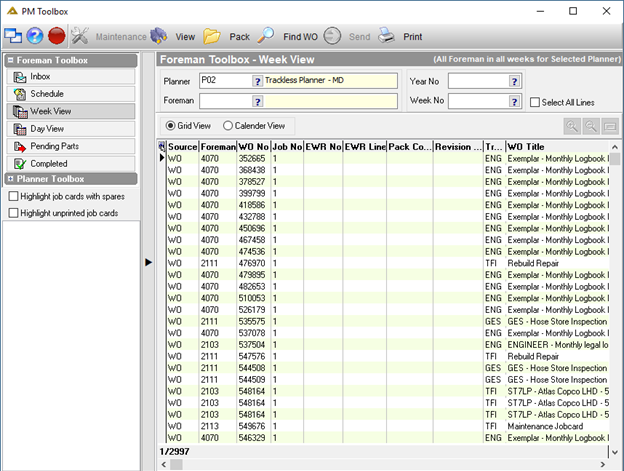
Parameter driven functionality exists where work orders can be rejected in Capture Feedback/Time application due to reasons like incomplete or illegible. These work orders goes for approval and statuses will be either 101 = Incorrectly filled in. Sent to Foreman, 301 = Incorrectly filled in. Pending Approval or 302 = Job Cancellation Pending Approval. Work orders with status 101 will be found on the Week view and Day view tabs of both Foreman and Planner toolbox.
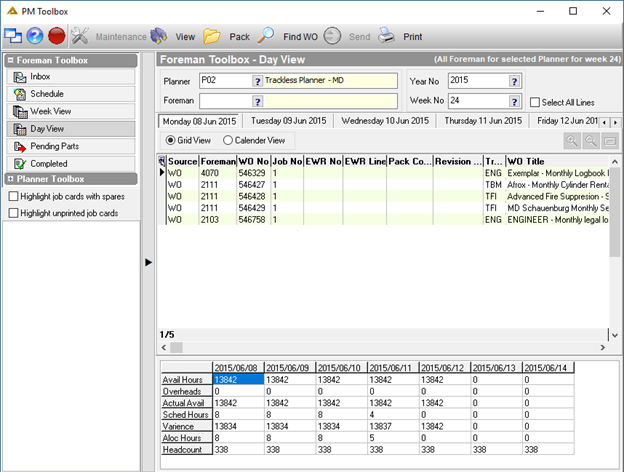
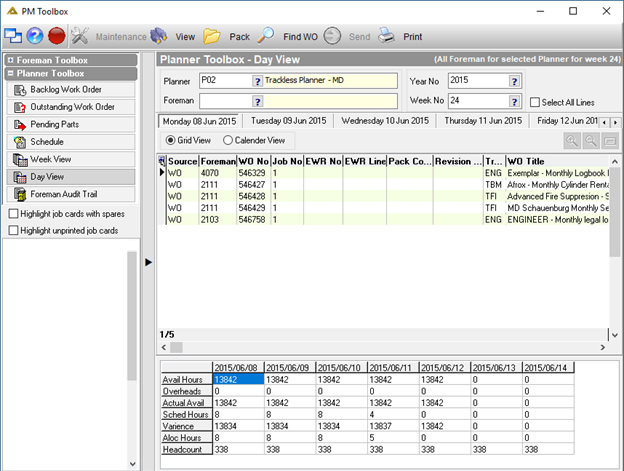
Day View - This option displays work orders of the same statuses as per the Week view. The difference is that it groups the work orders for the selected week into each individual day.
Note: The grid must be filtered by Year and Week to be able to select the Day View option.
The bottom of the Day View screen displays a grid which summarizes the work orders for each day.
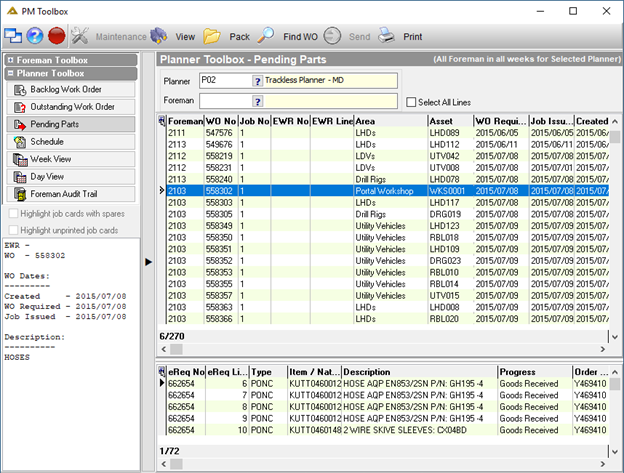
Pending Parts – This option will display all the Work Orders awaiting specific parts required before it can be completed. Work orders on this tab in the Foreman toolbox are status 70. The spare parts sub detail will be displayed on the Excel export.

Completed - This option displays all the work orders linked to the foreman that has been closed. The foreman can click on a line to see the feedback captured.
Planner Toolbox
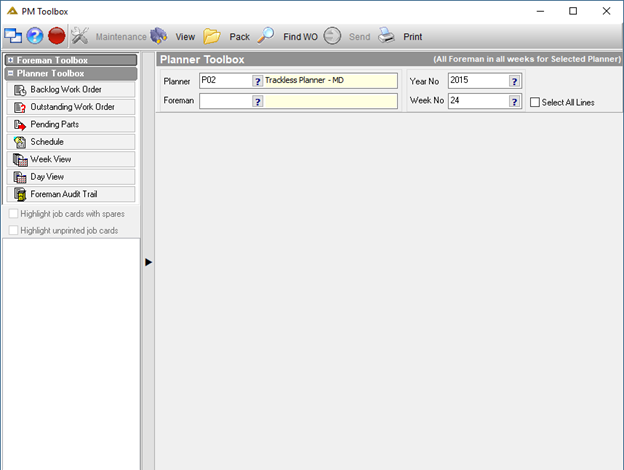
Backlog Work Order - This option has the same functionality as the Outstanding Work Order tab and displays the same data. The difference is that the user can specify a backlog date and the system will only show jobs less than the selected date. Work orders with status 10, 30 and 60 will be seen on this tab. When a Foreman sends a work order to the planner, the status will update to 10 and the work order will be found by the planner in the Backlog Work Order tab. If the planner adds parts to a status 10 work order, the status will update to status 60.
Outstanding Work Order - This option shows all the jobs which must be actioned by the planner.
Pending Parts - This option will display all the Work Orders awaiting specific parts required before it can be completed. The spare parts sub detail will be displayed on the Excel export.
Schedule Option - This option will show all work orders created for schedules generated on a certain date.
Select a date on which the schedule was generated and click on the ![]() button.
button.
Week View Option - This option displays all the active work orders for the planner (Status = 100) as well as work orders pending parts approval (status = 60 & 70). The Planner Toolbox will display all jobs for all foreman linked to the planner if no foreman is chosen.
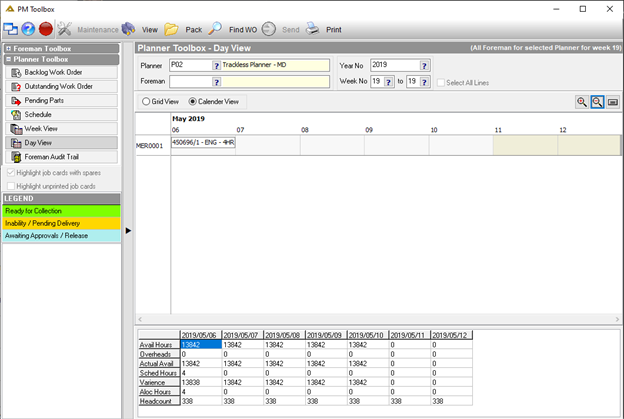
Day View - This option displays the same information as the Week View option. The difference is that it groups the work orders for the selected week into each individual day.
Note: The grid must be filtered by Year and Week to be able to select the Day View option.
The bottom of the Day View screen displays a grid which summarizes the work orders for each day.
By default, the Grid View radio button will be selected. If you select the Calendar View radio button, you will be able to view the following:
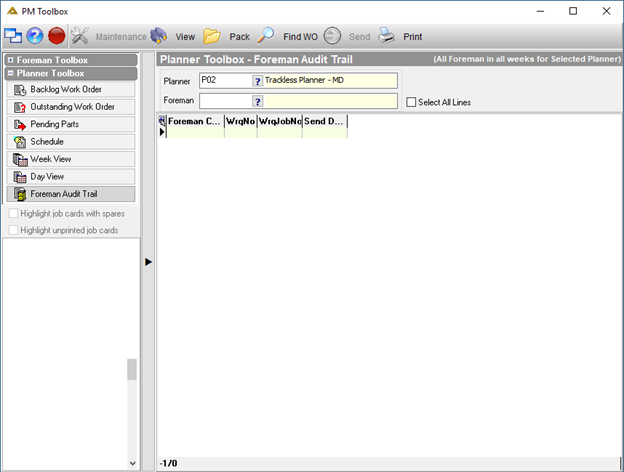
Foreman Audit Trail - This option displays the Foreman job movement. An audit entry is captured when clicking the Send to Foreman button.
The Highlight job cards with spares tick box will display a corresponding legend and the applicable lines will be highlighted.
The Highlight unprinted job cards tick box will display all applicable lines in bold if ticked.
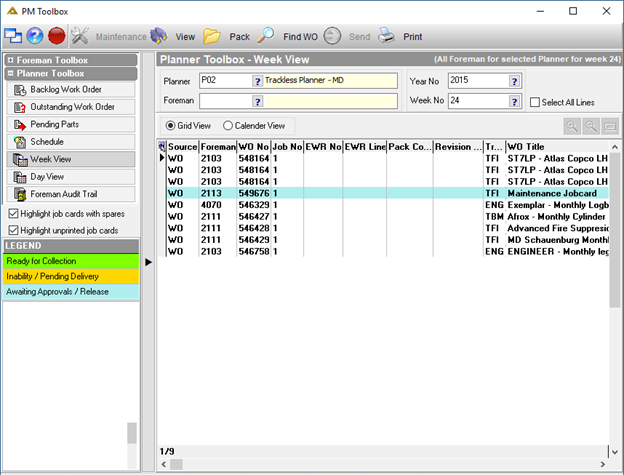
The Highlight job cards with spares and Highlight unprinted job cards options are disabled on Pending parts, Foreman audit trail, Foreman Inbox and Completed tabs.
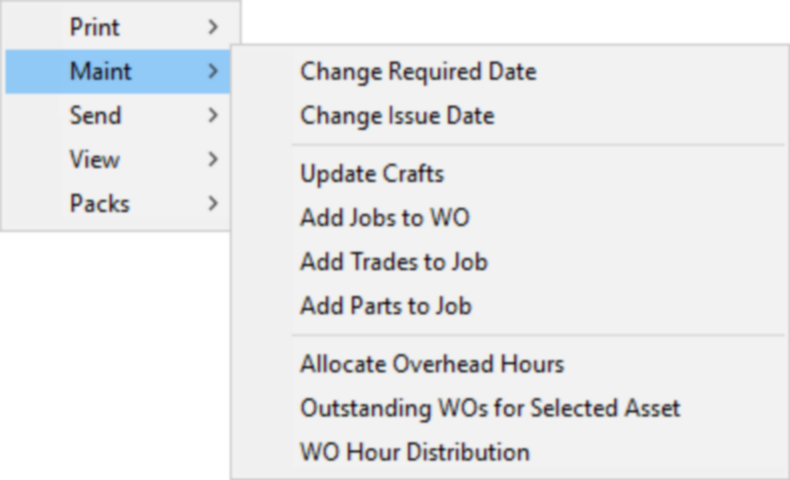
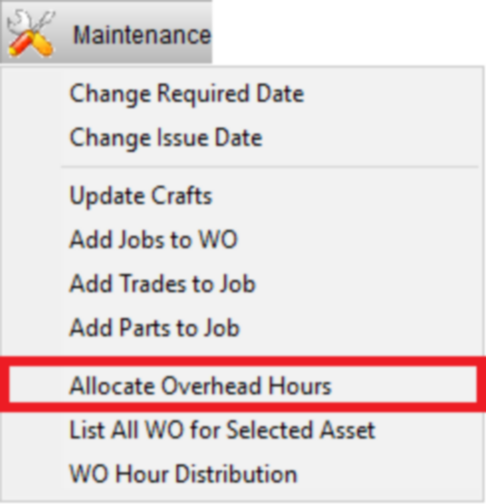
Using the Menu Bar - The Maintenance Button
The buttons on the menu bar is used to further manage the work orders.
Click the ![]() button on the menu bar to display the maintenance options available.
button on the menu bar to display the maintenance options available.
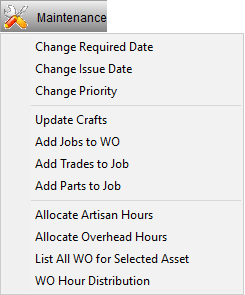
You can also right-click anywhere in the grid to access the maintenance menu options. Your menu options will be disabled if you did not enter a valid pin code when logging into the PM Toolbox.
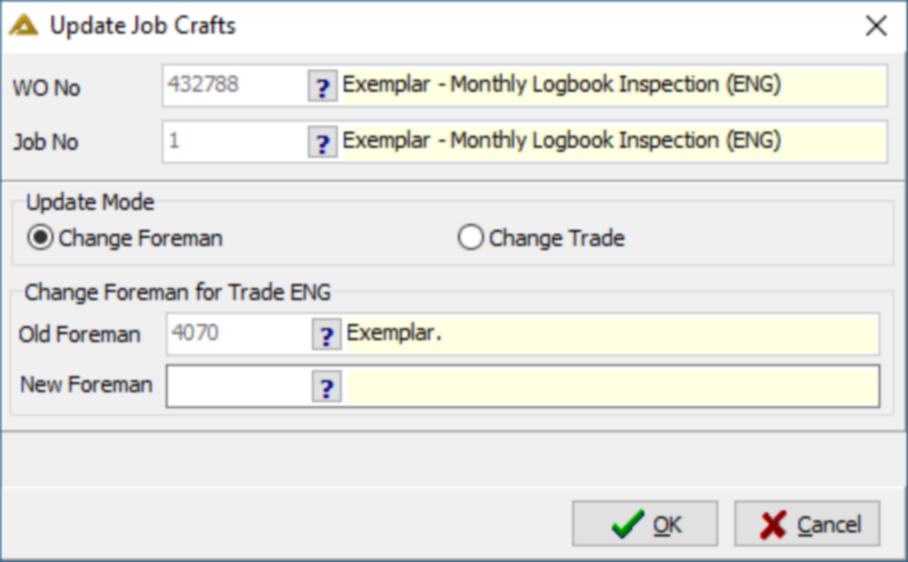
Update Job Crafts
This option allows you to update the Foreman or the Trade linked to the work order.
Job Maintenance
The job maintenance screen can be accessed from the Week or Day View.
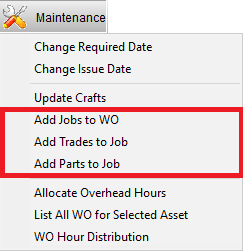
Any of these options will open the job maintenance screen and the corresponding tab. You can also open the Job Maintenance screen by double clicking a work order in the grid.
Maintaining WO Jobs
The WO Jobs tab shows all the jobs for the selected work order. Clicking a job line will load details for the selected job. (If PM_NO_COMPONENT is active, selection of the component will be optional.)
Certain fields of job lines can be amended by clicking the ![]() button.
button.
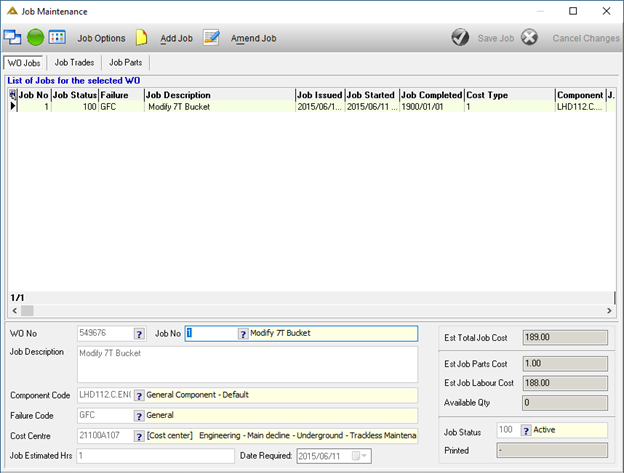
To create a new job line for the work order, click on the ![]() button and enter a description for the new job. The asset remains the same for all job lines. Select a component and the failure code. The correct cost centre will automatically be populated but can be changed if needed.
button and enter a description for the new job. The asset remains the same for all job lines. Select a component and the failure code. The correct cost centre will automatically be populated but can be changed if needed.
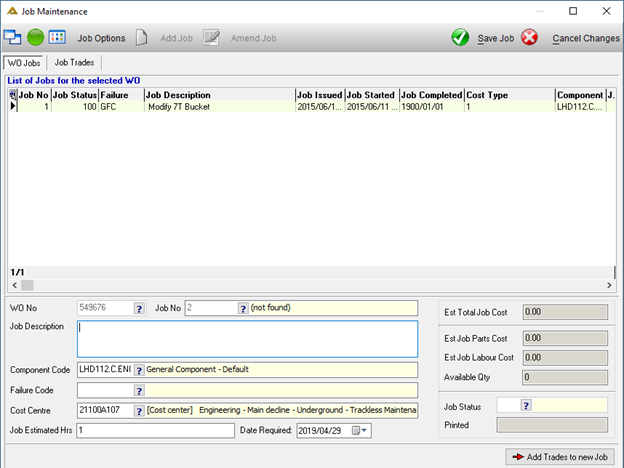
Specify the estimated time in hours. Click the ![]() button in the bottom left corner of the screen to start adding the trades (All job lines must have at least one trade)
button in the bottom left corner of the screen to start adding the trades (All job lines must have at least one trade)

Click on the ![]() button to add a trade to the new job line.
button to add a trade to the new job line.
Select a Foreman for the job and a trade. Enter a job description and specify the number of people working on the job and how long the estimated work time will be. Once completed click on the ![]() button to save the trade.
button to save the trade.
You can click the ![]() button in the bottom right corner of the screen to go back to the job details screen to make changes if needed.
button in the bottom right corner of the screen to go back to the job details screen to make changes if needed.
Click ![]() to save the newly created job line.
to save the newly created job line.
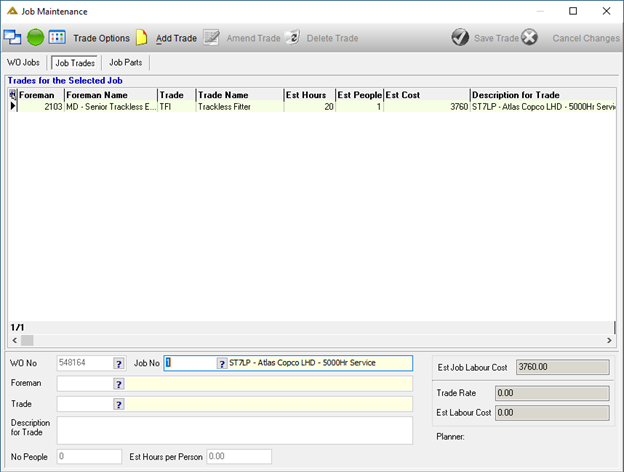
Maintaining Job Trades
The Job Trades tab shows all the trades for the selected job. Clicking a trade line will load details for the selected trade.
Trades can be amended by clicking the ![]() button.
button.
Trades can be deleted by clicking the ![]() button.
button.
New Trades can be added by clicking on the ![]() button.
button.
A Foreman will automatically be selected for the job but can be changed. Select a trade using the picker. Enter a job description and specify the number of people working on the job and how long the estimated work time will be. Once completed click on the ![]() button to save the newly added trade.
button to save the newly added trade.
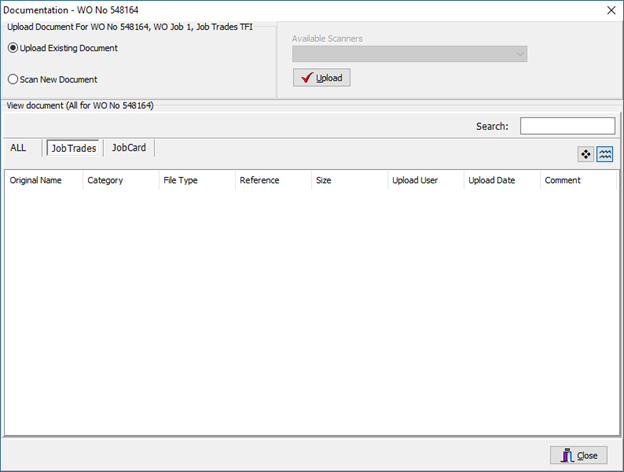
Documentation can be linked to each work order job trade using the  button.
You can view documents linked to the trade or link new documents.
Maintaining Job Parts
The Job Parts tab is used to manage item requests by the foreman. The top grid shows all the items linked to the selected job. Clicking an item line will load details for the selected item. When the foreman or planner adds parts to a work order with a suspended asset or component, the application will warn the user that the asset or component has been suspended. The planner or foreman can choose to override this message and continue to send the parts for approval.
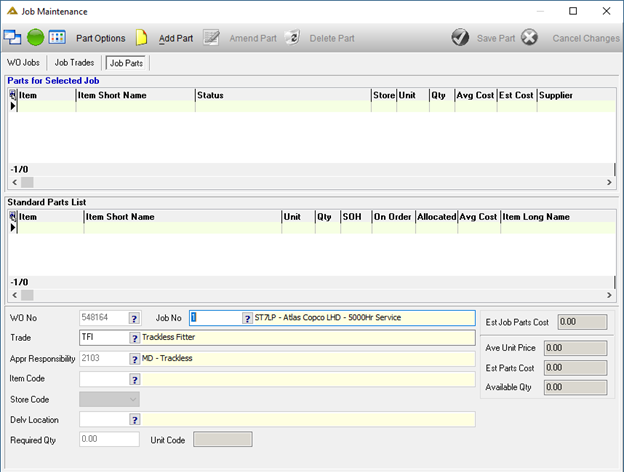
A new part can be added using the ![]() button. Select an Item Code and specify from which store the item must be issued. There must be a valid contract in place for the part being added. Choose a delivery location using the picker and enter the required quantity. The Delivery location picker will only return certain types of delivery locations. In the case of MCO functionality being used, this picker will only return the locations linked to the MCO in PM Masterfile Maintenance. Click on the
button. Select an Item Code and specify from which store the item must be issued. There must be a valid contract in place for the part being added. Choose a delivery location using the picker and enter the required quantity. The Delivery location picker will only return certain types of delivery locations. In the case of MCO functionality being used, this picker will only return the locations linked to the MCO in PM Masterfile Maintenance. Click on the ![]() button to link the item to the job. The item has only been linked to the job and has not yet been sent for approval. It can still be amended or removed by clicking the
button to link the item to the job. The item has only been linked to the job and has not yet been sent for approval. It can still be amended or removed by clicking the ![]() or
or ![]() buttons.
buttons.
Click on the 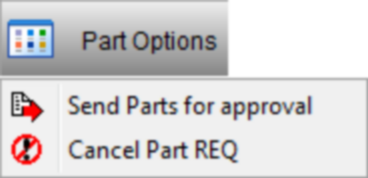 button to send for approval or cancel a requested part.
The Standard Parts List grid on the Job Parts tab displays all the BOM items linked to the asset (Commonly used items for maintenance of the asset)
You can double-click the Standard Parts List grid to request that item for the job. This makes it easier than searching through the item picker for the required spares.
Double-clicking an item in the Standard Parts List will populate the screen with item data.
Allocate Overhead Hours
The Overhead Hours screen is used to capture hours for artisans where no work was carried out due to various overheads (Training, Leave etc.) The screen will show all the overheads captured for the selected week and date. The overhead hours grid will only show overheads for artisans linked to the selected trade.
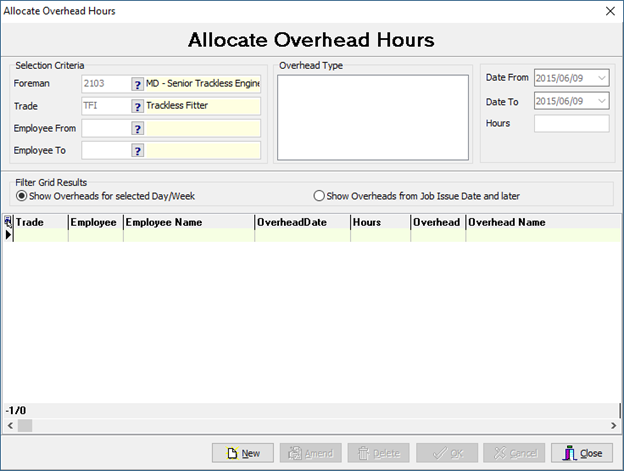
More than one artisan can be selected. The system will capture the overhead for all the employees in the selected range. More than one date can be selected. The system will capture an overhead for each day in the selected date range.
List All WO for Selected Asset
This screen allows you to view and select all outstanding job cards for the asset and move them as bulk to a new craft date. Double click on all the lines you wish to update. The indicator on the left will change to a ![]() for all selected rows.
for all selected rows.
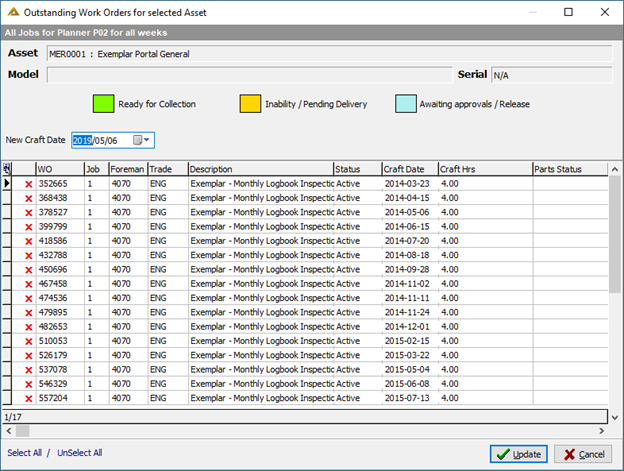
Choose the new date and click on the ![]() button.
button.
A few rules apply to this functionality:
1.The craft date will not be moved to a date before the issue date.
2.If the hours for a work order job for the same foreman and trade has been split over multiple days, the line for each day must be updated individually.
3.Cannot update a craft date to a new date if there is a job craft date for the work order for that day already. (same foreman and trade)
WO Hour Distribution
The WO Hour Distribution is used to specify and plan when the work must be carried out.
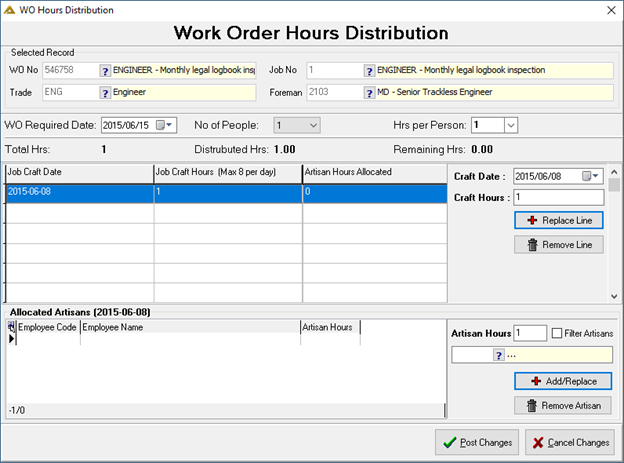
Total Hours - Refers to the estimated total amount of hours which the artisans will spend on the job. This amount can be modified from the job maintenance screen on the trades tab.
Allocated Hours - Refers to the portion of the Total Hours that have been allocated. The allocated hours will show in the grid and will indicate on which date the work must be carried out.
Remaining Hours - Refers to the number of hours that must still be allocated.
To change the allocated hours, select the allocation in the grid which must be edited. Select a new date and specify the new number of allocated hours.
Click on the ![]() button. Select an Artisan. You can amend the number of people and the hours per person by clicking on the corresponding drop down arrows.
button. Select an Artisan. You can amend the number of people and the hours per person by clicking on the corresponding drop down arrows.
You can also delete an artisan from the list by selecting the line you wish to delete and clicking on the ![]() button.
button.
Click on the ![]() button to save the changes.
button to save the changes.
The grid in the Week/Day view will now display a line for each of the distributed hours.
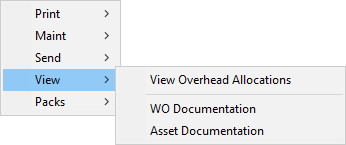
Using the Menu Bar - The View Button
Click the ![]() button on the menu bar to display the option available.
button on the menu bar to display the option available.
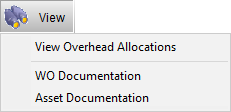
You can also right-click anywhere in the grid to access the view menu option. Your menu option will be disabled if you did not enter a valid pin code when logging into the PM Toolbox.
The Overhead Allocations screen will be opened. Here you have various filtering options.
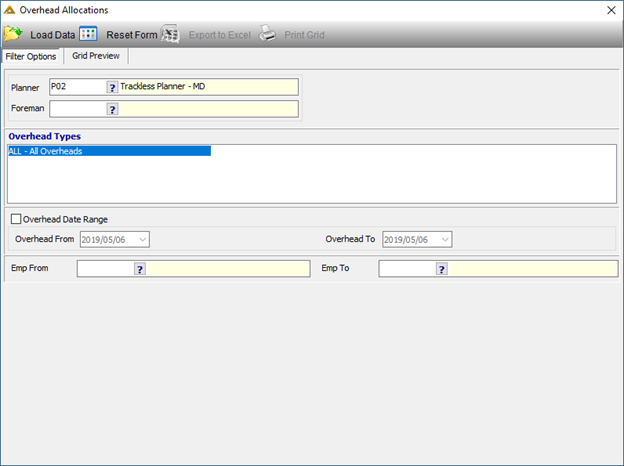
Click the ![]() button after selecting your filter options to load the data. The data will output in a grid on the Grid Preview tab. Click on the
button after selecting your filter options to load the data. The data will output in a grid on the Grid Preview tab. Click on the ![]() button to preview the report.
button to preview the report.
Using the Menu Bar - The Pack Button
This option allows you to group work orders together in shut down packs. All work orders to be completed during a shut down will be grouped in a pack. Through the Work Order Enquiry application, you can print reports on these packs such as status and % completed, etc. The ![]() button will give you the following options:
button will give you the following options:
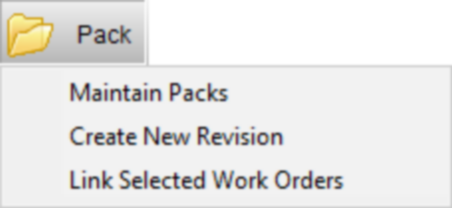
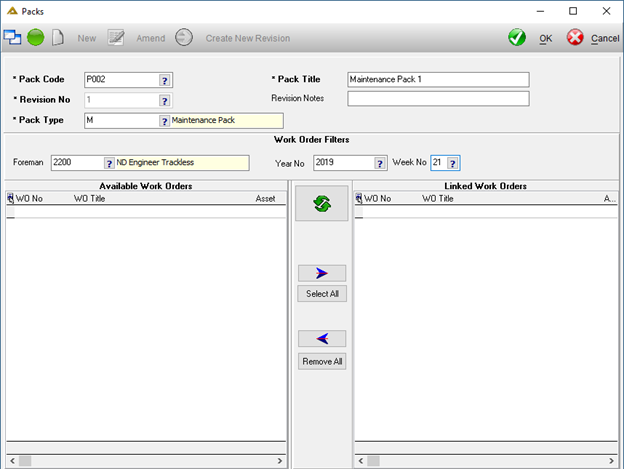
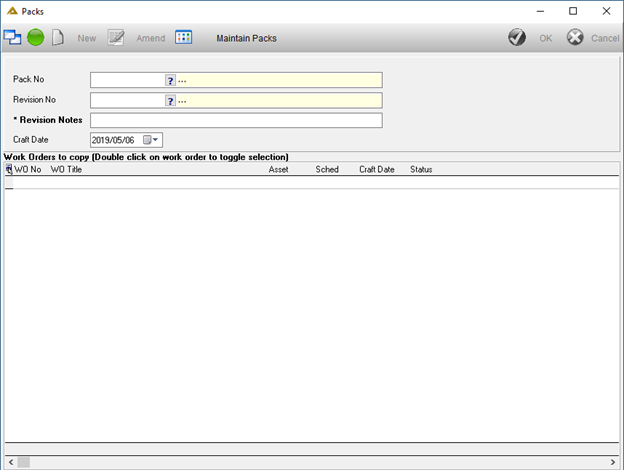
Maintain Packs
This option allows you to create a new pack, amend existing packs or create new revisions:
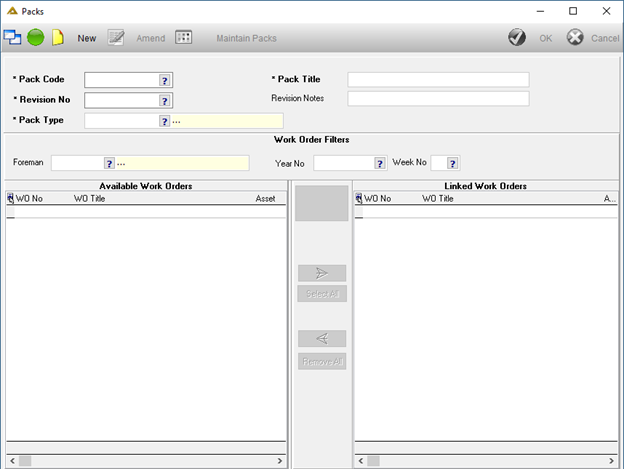
The ![]() button allows you to create a new pack. Required fields are marked with an asterisk (*). Pack Types are set up using the PM Master File Maintenance application.
button allows you to create a new pack. Required fields are marked with an asterisk (*). Pack Types are set up using the PM Master File Maintenance application.
Once you have entered all the information, click on the ![]() button to load all the work orders available for selection:
button to load all the work orders available for selection:
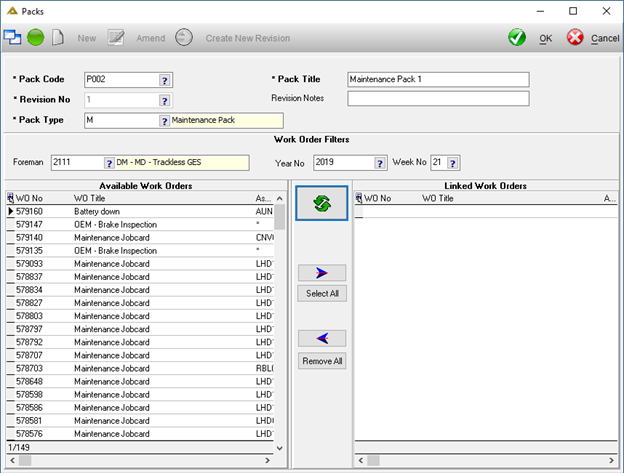
Work orders can be linked or removed by selecting the line and clicking on the ![]() or
or ![]() buttons or by double clicking on the line.
buttons or by double clicking on the line.
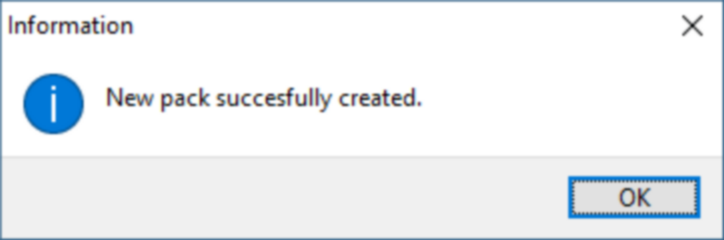
Once you have completed linking all the work orders you want to link, click on the ![]() button to save the pack.
button to save the pack.
To edit an existing pack, select it using the picker and click on the ![]() button. You will not be able to amend the pack code.
button. You will not be able to amend the pack code.
To create a new revision, select the pack code for which you wish to create a new revision and click on the ![]() button.
button.
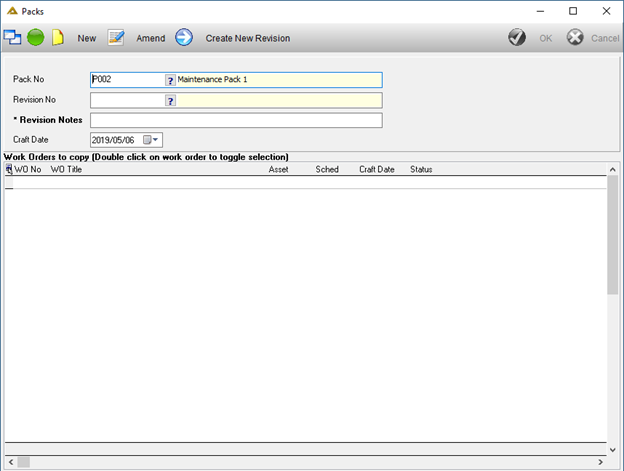
Complete the information and click on the ![]() button to save. To cancel and return to the previous screen without saving the new revision, click on the
button to save. To cancel and return to the previous screen without saving the new revision, click on the ![]() button.
button.
Create New Revision
This option will open the Create new revision screen directly:
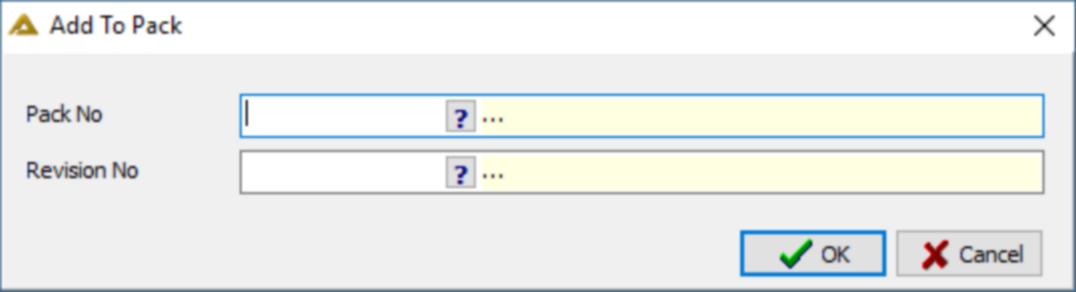
Link Selected Work Orders
This option allows you to link the work order selected in the grid to a specified pack number and revision number:
Using the Menu Bar - The Find WO Button
Click the ![]() button on the menu bar to open the Find Work Order screen.
button on the menu bar to open the Find Work Order screen.
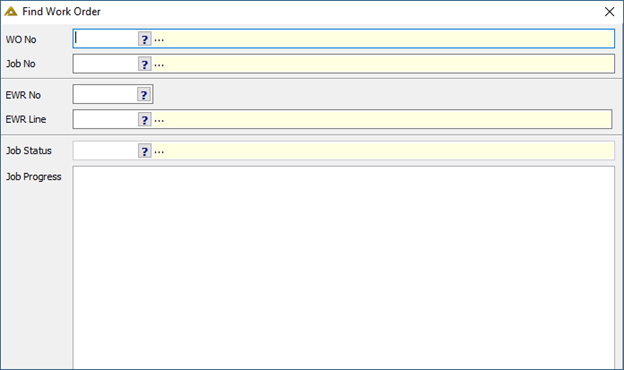
Select a WO Number using the picker. Select a Job Number which is linked to the WO Number.
The Job Status and Job Progress screens will automatically be populated with the information relating to the selected WO and Job.

Work orders with status 301/302 will return the message Cancellation of work order job waiting to be approved or Incorrectly completed work order awaiting approval.
Using the Menu Bar - The Send Button
Click the ![]() button on the menu bar to display the sending options available.
button on the menu bar to display the sending options available.
The Send to Foreman option allows you to move the job card from the Inbox to the Week View (Job updated to status 100)
The Send to Planner option allows you to send the job to the planner. Work orders sent to the planner will update to status 10. These work orders will no longer show in the Foreman Toolbox but can be found in the Outstanding Work Orders, Backlog, Week view and Day view tabs in the Planner Toolbox. The planner can then action it.
Using the Menu Bar - The Print Button
When you click on the ![]() button you will have the following options:
button you will have the following options:
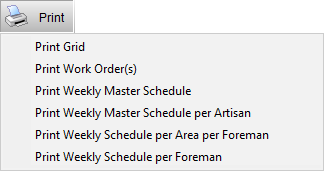
You can also right-click anywhere in the grid to access the print menu options. Your menu options will be disabled if you did not enter a valid pin code when logging into the PM Toolbox.
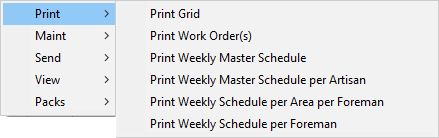
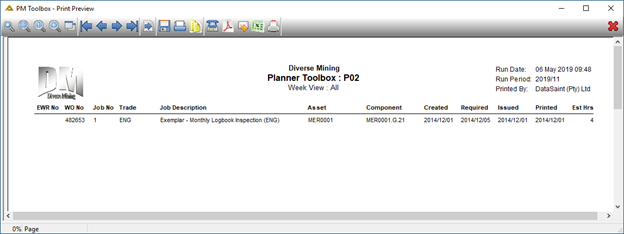
Print Grid Option
This option prints the grid as displayed:
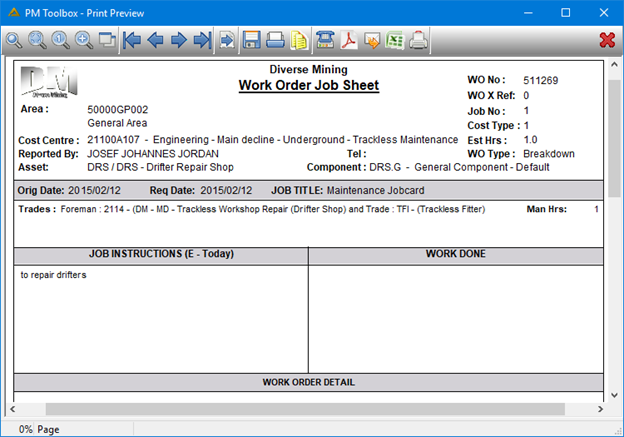
Print Work Order(s) Option
This option will print a Work Order Job sheet:
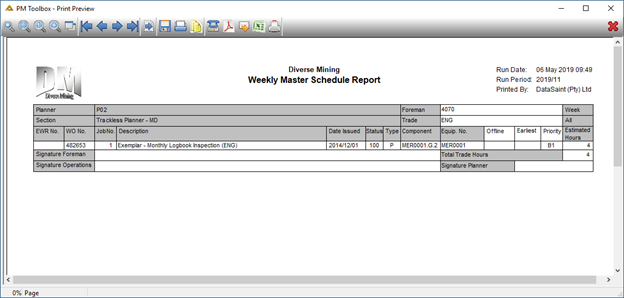
Print Weekly Master Schedule Option
This option prints all the work orders in one grid as seen below:
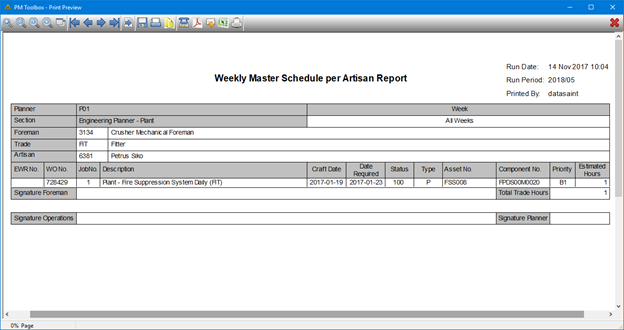
Print Weekly Master Schedule per Artisan Option
This option will print as above but work orders will be grouped by Artisan:
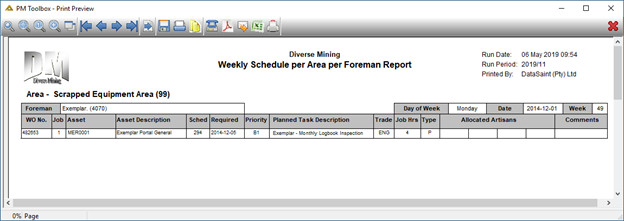
Print Weekly Schedule per Area per Foreman Option
This option prints the weekly schedule grouped by area by Foreman:
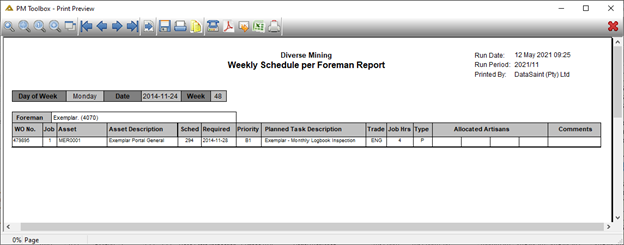
Print Weekly Schedule per Foreman Option
This option will list work orders per craft date and week number, grouped by Foreman.