Overview
This application allows the user to create and maintain patient records.
Function
Create a New Patient
Select the ![]() button to start a new record, alternatively select an existing patient using the picker in the Patient Code field and select the 'Amend' button to edit a patient's record.
button to start a new record, alternatively select an existing patient using the picker in the Patient Code field and select the 'Amend' button to edit a patient's record.
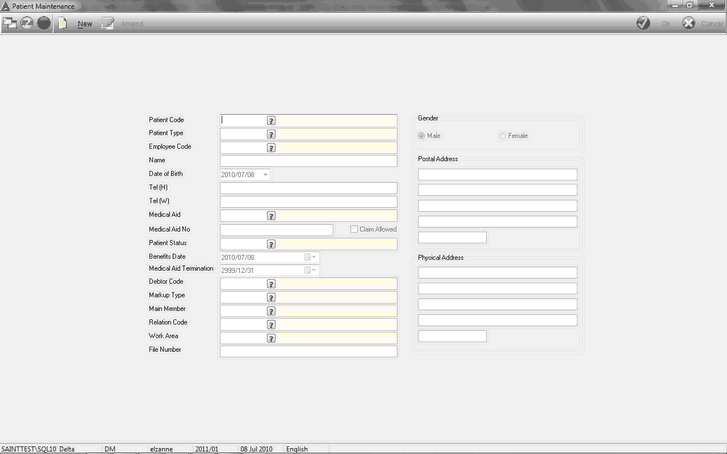
Enter\Select the following information:
•Patient Type - select the type of patient using the picker.
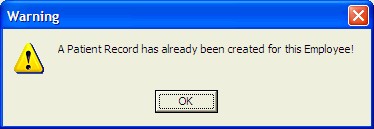
•Employee Code - select the employee code using the picker, if a patients record already exists the following message will appear. Select 'Ok' to continue and select another employee record.
•Name - enter the name of the patient.
•Date of Birth - select the date of birth of the patient.
•Tel - enter the contact numbers for work and home.
•Medical Aid - select the medical aid name using the picker.
•Medical Aid Number - enter the medical aid number.
•Claim Allowed - select this option if claims may be made against the medical aid.
•Patient Status - select the patient status:
oActive
oClosed
oSuspended
•Benefits Date - select the date for the medical aid benefits received using the drop down arrow.
•Medical Aid Termination - select the termination date of the medical aid using the drop down arrow.
•Debtor Code - select the debtor using the picker.
•Mark-up type - select the mark up % using the picker.
•Work Area - select the patients work area using the picker.
•File Number - enter the patients file number.
•Gender - select the gender of the patient:
oMale
oFemale
•Postal Address - enter the patients postal address.
•Physical Address - enter the patients physical address.
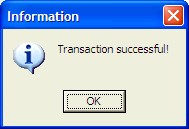
Select the '![]() ' button to save the record. The system will prompt the following message to confirm that the record was saved successfully. Select 'Ok' to continue.
' button to save the record. The system will prompt the following message to confirm that the record was saved successfully. Select 'Ok' to continue.
Amend Existing Patient Record
•Select the patient code using the picker in the Patient Code field.
•Select the 'Edit' button and change the necessary information.
•Select the 'Save' button to save the changes.
The system will prompt the following message to confirm that the transaction was successful.

Select '![]() ' to continue.
' to continue.
![]()